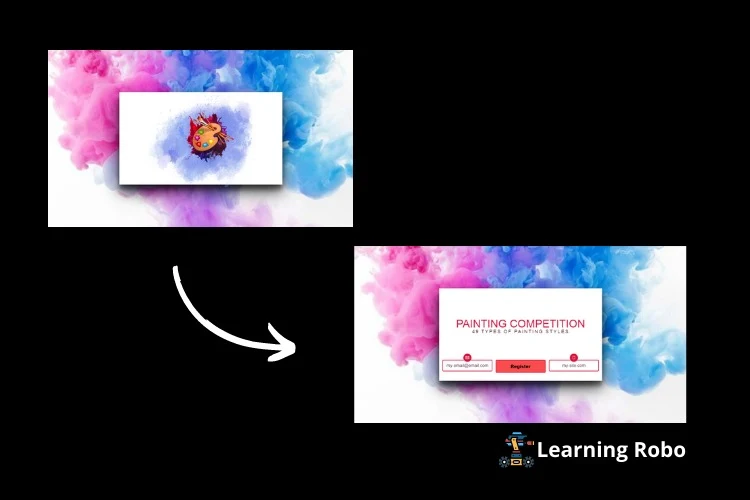
Hello developers, today in this blog, you'll learn to create a Responsive 3D Animated Card Design using HTML & CSS.
3D animation is the art of using motion to bring a card, character, word, or object to move. In 3D animation, the object can be moved and removed following the same principles as real life.
In this blog (Responsive 3D Animated Card Design) on the webpage, there is the card at the center of the webpage with the logo at the center. If you hover over the card, the card will flip with the 3D motion. The back card contains the heading, a sub-heading, three buttons with their respective icons. This card is made responsive by using the CSS @media query property. If the screen size is smaller, then the button list in the back card is arranged one after the other.
The source code of this Responsive 3D Animated Card Design is given below, if you want the source code of this program, you can copy it. You can use this Responsive 3D Animated Card Design with your creativity and can take this project to the next level.
Responsive 3D Animated Card Design [Source Code]
To make this website, you would like to make two files: an HTML file & a CSS file. First, create an HTML file with the name of index.html and remember, you have to create a file with a .html extension.
*{
	box-sizing:border-box
}
body {
  margin: 0;
  background-image: url("https://cdn.pixabay.com/photo/2020/06/18/18/03/paint-5314505__340.jpg");
  background-position: center;
  background-size: cover;
  text-align: center;
  position: relative;
  height: 100vh;
  display: flex;
  align-items: center;
}
.container {
  width: 600px;
  height: 340px;
  margin: 0 auto;
  position: relative;
  -webkit-perspective: 1000;
	-moz-perspective: 1000;
	perspective: 1000;
  -moz-transform: perspective(1400px);
	-ms-transform: perspective(1400px);
	-webkit-transform-style: preserve-3d;
  -moz-transform-style: preserve-3d;
  transform-style: preserve-3d;
  perspective-origin: right;
}
.card {
  width: 600px;
  height: 340px;
  box-shadow: 0 27px 55px 0 rgba(0, 0, 0, .7), 0 17px 17px 0 rgba(0, 0, 0, .5);
  position: relative;
  -webkit-transform: rotate(0deg);
  -moz-transform: rotate(0deg);
  -ms-transform: rotate(0deg);
  transform: rotate(0deg);
  -webkit-transform-origin: 100% 0%;
  -moz-transform-origin: 100% 0%;
  -ms-transform-origin: 100% 0%;
  transform-origin: 100% 0%;
  -webkit-transform-style: preserve-3d;
  -moz-transform-style: preserve-3d;
  transform-style: preserve-3d;
  transition: .8s ease-in-out;
}

.front, .back {
  position: absolute;
  top: 0;
  left: 0;
  width: 100%;
  height: 100%;
  background: white;
  -webkit-backface-visibility: hidden;
  -moz-backface-visibility: hidden;
  backface-visibility: hidden;
}
.front {
  display:-webkit-flex;
  display: flex;
  -webkit-justify-content: center;
  justify-content: center;
  -webkit-align-items: center;
  align-items: center;
  z-index: 2;
  -webkit-transform: rotateY(0deg);
  -moz-transform: rotateY(0deg);
  -ms-transform: rotateY(0deg);
  transform: rotateY(0deg);
}
.back {
  -webkit-transform: rotateY(-180deg);
  -moz-transform: rotateY(-180deg);
  -ms-transform: rotateY(-180deg);
  transform: rotateY(-180deg);
  font-family: 'Arimo', sans-serif;
}
.container:hover .card {
  -webkit-transform: rotateY(180deg) translateX(100%);
  -moz-transform: rotateY(180deg) translateX(100%);
  -ms-transform: rotateY(180deg) translateX(100%);
  transform: rotateY(180deg) translateX(100%);
  cursor: pointer;
}
ul {
  margin: 0;
  width: 100%;
  list-style: none;
  position: absolute;
  bottom: 30px;
  left: 0;
  padding: 0 1%;
}
li {
  width: 31.3333333333%;
  margin: 0 1%;
  float: left;
  padding: 10px;
  border: 2px solid crimson;
  border-radius: 4px;
  position: relative;
  text-align: center;
  color: #4E203C;
}
li:before {
  position: absolute;
  top: -25px;
  left: 50%;
  margin-left: -15px;
  width: 30px;
  height:30px;
  background: crimson;
  color: white;
  line-height: 30px;
  text-align: center;
  border-radius: 50%;
  font-family: FontAwesome;
  color: #fff;
}
li:nth-child(1):before {content: "\2709"}
li:nth-child(2){font-weight: 900; color: #000;background: #fc4c4e;}
li:nth-child(3):before {content: "\f0c1"}
h1 {
  color: crimson;
  text-transform: uppercase;
  font-weight: 400;
  line-height: 1;
  margin-top: 110px;
  text-align: center;
  font-size: 40px;
}
h1 span {
  color: #4E203C;
  display: block;
  font-size: .45em;
  letter-spacing: 3px;
}
.img1{
	height: 400px;
	width: 400px;
	z-index: 1;
}
.img2{
	height: 250px;
	width: 250px;
	position: absolute;
	margin-left: 50px;
	margin-bottom: 20px;
	z-index: 2;
}
@media only screen and (max-width: 800px){
	.card{
		  width: 70vh;
  		height: 55vh;
  		text-align: center;
    	position: relative;
  		display: flex;
  		align-items: center;
	}
	h1{
		margin-top: 30px;
	}
	span{
		margin: 20px;
	}
	.card .back{
		height: 70vh;
	}
	li {
    width: 90%;
    margin: 13px;
  }
}
Thank you for reading our blog. If you face any problem creating this Responsive 3D Animated Card Design using HTML & CSS, then contact us or comment us. We'll try to provide the solution to your problem as soon as possible.


Post a Comment
Thank you
Learning robo team