Filterable Product Gallery using HTML, CSS & JavaScript

Filterable Product Gallery using HTML, CSS & JavaScript


Hello developers, today in this blog you'll learn to make a Filterable Product Gallery using HTML, CSS & JavaScript.

A product card is used to display a picture or image and the description of that product or an item. A product gallery displays the image or picture of many products of a company with that particular product description. 

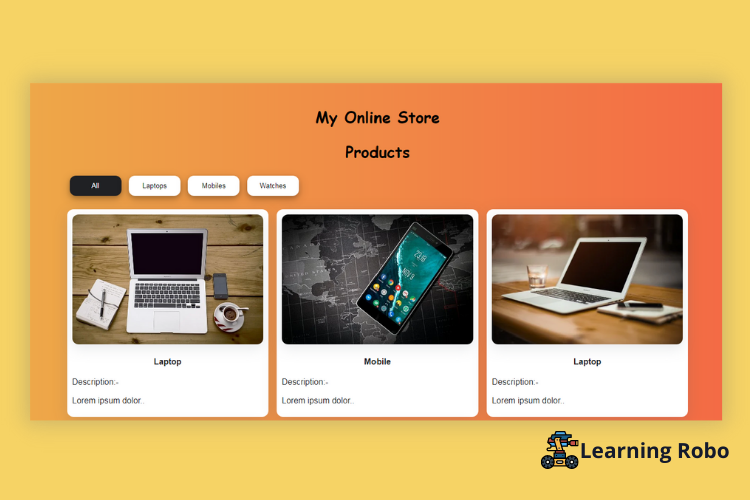
A filterable product gallery displays as many products with images and descriptions of the product as you want. The most salient feature of this filterable product gallery is that you can categorize all the products based on a particular parameter.

In this blog (Filterable Product Gallery), there are nine products with the filter names navbar on the top. These products are separated into different categories. Those categories are labeled as All, Laptops, Mobiles, Watches. You can see all the product cards with their images and description when the navbar All is active.

On clicking other product navbars you can see the products of that particular parameter. When you click on the laptops, laptop-related products with their image and description only will appear. Similarly, when you click on the mobiles, mobile-related products with their image and description only will appear. This is done by using the Filter property in JavaScript.

The source code of this Filterable Product Gallery is given below, if you want the source code of this program, you can copy it. You can use this Filterable Product Gallery code on your projects.

Filterable Product Gallery [Source Code]

To make this website, you would like to make three files: an HTML file, a CSS file & a JavaScript file. First, create an HTML file with the name of index.html and remember, you've to make a file with a .html extension.

<!DOCTYPE html> <html> <head> <title>Product gallery || LearningRobo</title> <meta name="viewport" content="width=device-width, initial-scale=1"> <link rel="stylesheet" href="style.css"> </head> <body> <div class="main"> <h2>My Online Store</h2> <h2>Products</h2> <div id="myBtnContainer"> <button class="btn active" onclick="filterSelection('all')">All</button> <button class="btn" onclick="filterSelection('Laptop')"> Laptops</button> <button class="btn" onclick="filterSelection('Mobile')">Mobiles</button> <button class="btn" onclick="filterSelection('Watch')">Watches</button> </div> <div class="row"> <div class="column Laptop"> <div class="content"> <img src="https://cdn.pixabay.com/photo/2014/05/02/21/50/laptop-336378__480.jpg" alt="Laptop" style="width:100%"> <h4>Laptop</h4> <p>Description:-<br><br>Lorem ipsum dolor..</p> </div> </div> <div class="column Mobile"> <div class="content"> <img src="https://cdn.pixabay.com/photo/2016/11/29/12/30/phone-1869510__340.jpg" alt="Mobile" style="width:100%"> <h4>Mobile</h4> <p>Description:-<br><br>Lorem ipsum dolor..</p> </div> </div> <div class="column Laptop"> <div class="content"> <img src="https://cdn.pixabay.com/photo/2014/05/02/21/49/laptop-336373__340.jpg" alt="Laptop" style="width:100%"> <h4>Laptop</h4> <p>Description:-<br><br>Lorem ipsum dolor..</p> </div> </div> <div class="column Laptop"> <div class="content"> <img src="https://cdn.pixabay.com/photo/2016/02/19/10/00/laptop-1209008__340.jpg" alt="Laptop" style="width:100%"> <h4>Laptop</h4> <p>Description:-<br><br>Lorem ipsum dolor..</p> </div> </div> <div class="column Watch"> <div class="content"> <img src="https://cdn.pixabay.com/photo/2015/06/25/17/22/smart-watch-821559__340.jpg" alt="Wrist-Watch" style="width:100%"> <h4>Watch</h4> <p>Description:-<br><br>Lorem ipsum dolor..</p> </div> </div> <div class="column Mobile"> <div class="content"> <img src="https://cdn.pixabay.com/photo/2017/08/01/09/07/mobile-2563782__340.jpg" alt="Mobile" style="width:100%"> <h4>Mobile</h4> <p>Description:-<br><br>Lorem ipsum dolor..</p> </div> </div> <div class="column Mobile"> <div class="content"> <img src="https://cdn.pixabay.com/photo/2018/04/27/03/51/technology-3353701__340.jpg" alt="Mobile" style="width:100%"> <h4>Mobile</h4> <p>Description:-<br><br>Lorem ipsum dolor..</p> </div> </div> <div class="column Watch"> <div class="content"> <img src="https://cdn.pixabay.com/photo/2015/06/25/17/21/smart-watch-821557__340.jpg" alt="Wrist-Watch" style="width:100%"> <h4>Watch</h4> <p>Description:-<br><br>Lorem ipsum dolor..</p> </div> </div> <div class="column Watch"> <div class="content"> <img src="https://cdn.pixabay.com/photo/2014/07/31/23/00/wristwatch-407096__340.jpg" alt="Wrist-Watch" style="width:100%"> <h4>Watch</h4> <p>Description:-<br><br>Lorem ipsum dolor..</p> </div> </div> </div> </div> <div class="credit">Made with &#10084; by <a href="https://www.learningrobo.com/">Learning Robo</a></div> <script src="script.js"></script> </body> </html>

CSS provides style to an HTML page. To form the page attractive create a CSS file with the name style.css and remember that you've got to make a file with a .css extension. 

* {
    box-sizing: border-box;
  }
  
  body {
    background: #f46b45;  /* fallback for old browsers */
    background: -webkit-linear-gradient(to right, #eea849, #f46b45);  /* Chrome 10-25, Safari 5.1-6 */
    background: linear-gradient(to right, #eea849, #f46b45); /* W3C, IE 10+/ Edge, Firefox 16+, Chrome 26+, Opera 12+, Safari 7+ */
    
    padding: 20px;
    font-family: Arial;
  }
  img{
      height:250px;
      border-radius: 12px;
      box-shadow: rgba(149, 157, 165, 0.2) 0px 8px 24px;
  }

  .main {
    max-width: 1200px;
    margin: auto;
  }
  
  h2 {
    font-size: 30px;
    word-break: break-all;
    text-align: center;
    font-family: cursive;
    
  }
  
  .row {
    margin: 10px -16px;
  }
  
 
  .row,
  .row > .column {
    padding: 8px;
  }
  
  
  .column {
    float: left;
    width: 33.33%;
    display: none; 
  }
  

  .row:after {
    content: "";
    display: table;
    clear: both;
  }
  

  .content {
    background-color: #fff;
    padding: 10px;
    border-radius: 12px;
    height:400px;
    box-shadow: rgba(100, 100, 111, 0.2) 0px 7px 29px 0px;
  }
  .content:hover{
    box-shadow: rgba(0, 0, 0, 0.1) 0px 10px 50px;
    transform: translateY(-10px);
  }
 .content >h4{
     color:#202124;
text-align:center ;
 }
 .content>p{
     color:#202124
 }
  .show {
    display: block;
  }
  

  .btn {
    border: none;
    margin: 0 5px;
    outline: none;
    padding: 12px 16px;
    background-color: white;
    cursor: pointer;
    border-radius: 12px;
    width:100px;
    box-shadow: 0 4px 8px 0 rgba(0, 0, 0, 0.2), 0 6px 20px 0 rgba(0, 0, 0, 0.19);
  }
  
  .btn:hover {
    background-color: #ddd;
  }
  
  .btn.active {
    background-color: #202124;
    color: white;
  }

  .credit{
    text-align: center;
    color: #000;
    padding-bottom:5px;
    font-family: 'Trebuchet MS', 'Lucida Sans Unicode', 'Lucida Grande', 'Lucida Sans', Arial, sans-serif;
}
.credit a{
    color:#000
}

JavaScript makes the page work functionally. At last, create a JavaScript file with the name of script.js, and remember that you've got to make a file with a .js extension. 

filterSelection("all") function filterSelection(c) { var x, i; x = document.getElementsByClassName("column"); if (c == "all") c = ""; for (i = 0; i < x.length; i++) { RemoveClass(x[i], "show"); if (x[i].className.indexOf(c) > -1) AddClass(x[i], "show"); } } function AddClass(element, name) { var i, arr1, arr2; arr1 = element.className.split(" "); arr2 = name.split(" "); for (i = 0; i < arr2.length; i++) { if (arr1.indexOf(arr2[i]) == -1) {element.className += " " + arr2[i];} } } function RemoveClass(element, name) { var i, arr1, arr2; arr1 = element.className.split(" "); arr2 = name.split(" "); for (i = 0; i < arr2.length; i++) { while (arr1.indexOf(arr2[i]) > -1) { arr1.splice(arr1.indexOf(arr2[i]), 1); } } element.className = arr1.join(" "); } // Add active class to the current button (highlight it) var btnContainer = document.getElementById("myBtnContainer"); var btns = btnContainer.getElementsByClassName("btn"); for (var i = 0; i < btns.length; i++) { btns[i].addEventListener("click", function(){ var current = document.getElementsByClassName("active"); current[0].className = current[0].className.replace(" active", ""); this.className += " active"; }); }

We hope you would like this Filterable Product Gallery using HTML, CSS & JavaScript.

Thank you for reading our blog. If you face any problem in creating this Filterable Product Gallery using HTML, CSS & JavaScript, then contact us or comment us. We’ll try to provide a solution to your problem as soon as possible.


Thank you
Learning robo team

إرسال تعليق

Thank you
Learning robo team

Post a Comment (0)

أحدث أقدم
Learning Robo says...
code copied
Welcome