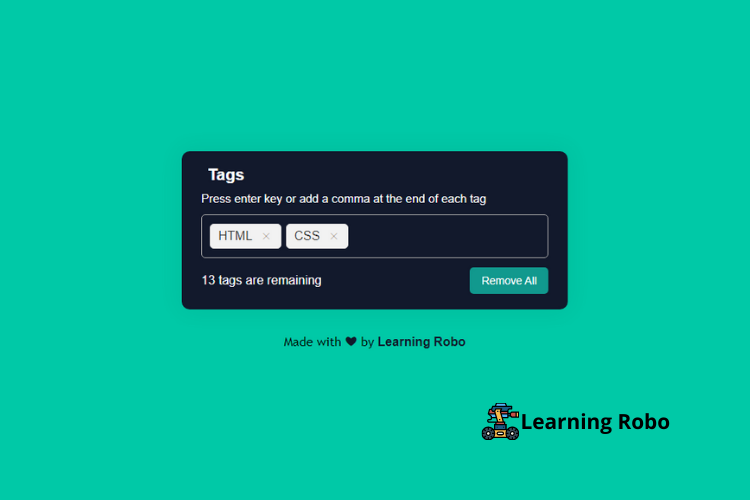
Hello developers, today in this blog, you'll learn to create an Add Tags Input Box using HTML, CSS & JavaScript.
An input box is a field where the user can add or insert many entries. A tags input is a user interface component that allows the user to add or insert many entries as a tag as an input. The input box with some tags, buttons, and tags counters. simply, the input box is an input field where the user can enter the data.
In this blog (Add Tags Input Box), on the webpage, there is an input box with some tags, buttons, and tags counter at the center of the webpage. There are input tags, where you can type your data to make it as a tag. After you enter your data, by clicking the enter button on the keyboard of your device, the data will become a tag. You can enter a maximum of 15 tags in the input field. After entering your data into the input field, there is a counter which shows you the remaining number of the tags to enter into the input field. In the input field, there is a cross symbol, to remove the input tag, and also there is a Remove All button, below the input field which removes all your input tags and makes the input box empty, now the counter shows you that there are 15 tags are remaining.
The source code of this Add Tags Input Box is given below, if you want the source code of this program, you can copy it. You can use this Add Tags Input Box with your creativity and can take this project to the next level.
Add Tags Input Box [Source Code]
To make this website (Add Tags Input Box), you need to create three files: an HTML file, a CSS file, and a JavaScript file. First, create an HTML file with the name of index.html and remember, you have to create a file with a .html extension.
*{
  margin: 0;
  padding: 0;
  box-sizing: border-box;
  font-family: 'Poppins', sans-serif;
}
body{
  display: flex;
  align-items: center;
  justify-content: center;
  min-height: 100vh;
  background: #00C9A7;
}
::selection{
  color: #fff;
  background: #5372F0;
}
.wrapper{
  width: 496px;
  background: #12192c;
  color: #fff;
  border-radius: 10px;
  padding: 18px 25px 20px;
  box-shadow: 0 0 30px rgba(0,0,0,0.06);
}
.wrapper :where(.title, li, li i, .details){
  display: flex;
  align-items: center;
}
.title h2{
  font-size: 21px;
  font-weight: 600;
  margin-left: 8px;
}
.wrapper .content{
  margin: 10px 0;
}
.content p{
  font-size: 15px;
}
.content ul{
  display: flex;
  flex-wrap: wrap;
  padding: 7px;
  margin: 12px 0;
  border-radius: 5px;
  border: 1px solid #a6a6a6;
}
.content ul  li{
  color: #333;
  margin: 4px 3px;
  list-style: none;
  border-radius: 5px;
  background: #F2F2F2;
  padding: 5px 8px 5px 10px;
  border: 1px solid #e3e1e1;
}
.content ul li i{
  height: 20px;
  width: 20px;
  color: #967132;
  margin-left: 8px;
  font-size: 12px;
  cursor: pointer;
  border-radius: 50%;
  justify-content: center;
}
.content ul li i:hover{
  background-color: #12192c;
}
.content ul input{
  flex: 1;
  padding: 5px;
  border: none;
  outline: none;
  font-size: 16px;
  background: #12192c;
  color: #fff;
}
.wrapper .details{
  justify-content: space-between;
}
.details button{
  border: none;
  outline: none;
  color: #fff;
  font-size: 14px;
  cursor: pointer;
  padding: 9px 15px;
  border-radius: 5px;
  background: #11998e;
  transition: background 0.3s ease;
}
.details button:hover{
  background: #38ef7d;
  color: #000;
}
.credit{
    text-align: center;
    color: #000;
    margin-top: 30px;
    font-family: 'Trebuchet MS', 'Lucida Sans Unicode', 'Lucida Grande', 'Lucida Sans', Arial, sans-serif;
}
.credit a{
    text-decoration: none;
    color: #12192c;
    font-weight: bold;
}
const ul = document.querySelector("ul"),
input = document.querySelector("input"),
tagNumb = document.querySelector(".details span");
let maxTags = 15,
tags = ["HTML", "CSS"];
countTags();
createTag();
function countTags(){
    input.focus();
    tagNumb.innerText = maxTags - tags.length;
}
function createTag(){
    ul.querySelectorAll("li").forEach(li => li.remove());
    tags.slice().reverse().forEach(tag =>{
        let liTag = `${tag} `;
        ul.insertAdjacentHTML("afterbegin", liTag);
    });
    countTags();
}
function remove(element, tag){
    let index  = tags.indexOf(tag);
    tags = [...tags.slice(0, index), ...tags.slice(index + 1)];
    element.parentElement.remove();
    countTags();
}
function addTag(e){
    if(e.key == "Enter"){
        let tag = e.target.value.replace(/\s+/g, ' ');
        if(tag.length > 1 && !tags.includes(tag)){
            if(tags.length < 10){
                tag.split(',').forEach(tag => {
                    tags.push(tag);
                    createTag();
                });
            }
        }
        e.target.value = "";
    }
}
input.addEventListener("keyup", addTag);
const removeBtn = document.querySelector(".details button");
removeBtn.addEventListener("click", () =>{
    tags.length = 0;
    ul.querySelectorAll("li").forEach(li => li.remove());
    countTags();
});
Thank you for reading our blog. If you face any problem creating this Add Tags Input Box using HTML, CSS & JavaScript, then contact us or comment us. We'll try to provide a solution to your problem as soon as possible.


إرسال تعليق
Thank you
Learning robo team